New Pools
v5
Gateway URL: https://gateway.vectorsurv.org/v5/tick/pool/pool
Video Tutorial: https://youtu.be/9G_-T5stgHk
Pool submissions are records of groups of ticks sent to be tested for arboviruses.
This page serves the same purpose as the optional pool entry form on the new collection page. Pools entered here can be linked back to a specific collection from the Collection Management page. One or the other should be used to submit a single pool.
Form
Fields
-
Collection Date: The date the trap was picked up / last day of the collection. You can type a date value in the format set under Account Preferences or pick a date using the datepicker UI.
-
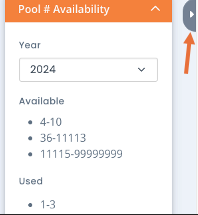
Pool Number: A numeric identifier for the pool. A collection date needs to be selected before you can choose a pool number. Pool numbers have to be unique per agency per year. Normally you would start at 1 and increment throughout the year but the exact numbering scheme is up to you. Available numbers for your agency are shown in the aside menu on the right-hand side of the page. Open the orange Pool # Availability card. You can open and close the menu using the small arrow tab on the far-right edge of the page.
-
Method: The type of trap placed in the field. Start typing to filter the list.
-
Site Code: The site where a trap was placed. A collection date needs to be selected before you can choose a trap site. Start typing in any part of the site code or name and the dropdown will filter the sites to that text. Selecting a site code from the dropdown select will place a blue marker on the map. You can also select a site using the ‘Show Existing Sites’ toggle in the Map section.
-
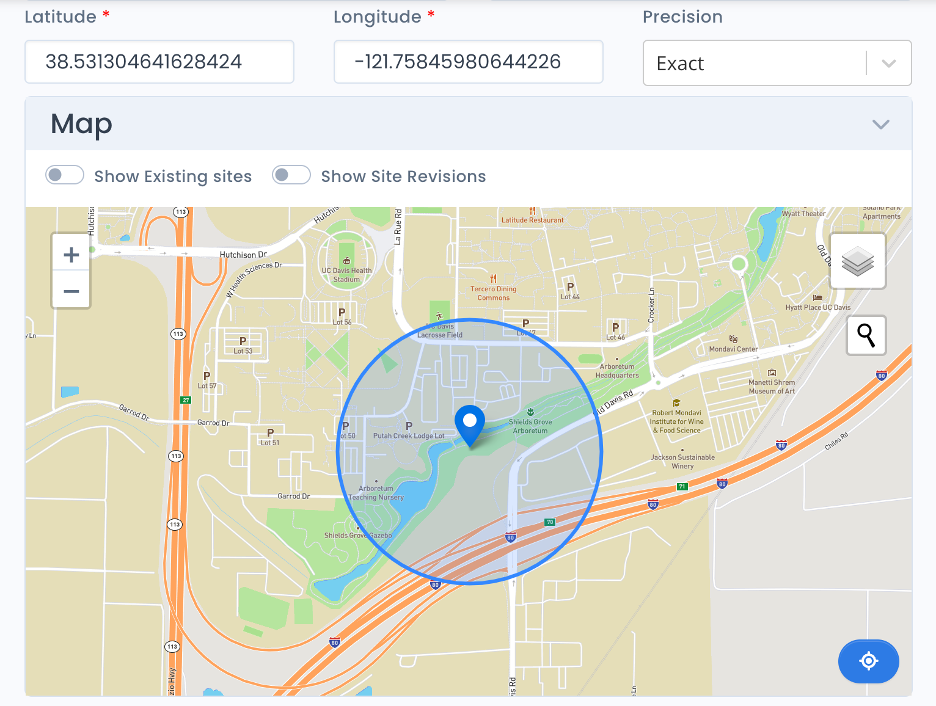
Precision: Used to specify the level of certainty in the site coordinate. In most cases, this field should be kept as Exact. For historical data, instances where the exact location is uncertain or in instances where the exact location need to be obscured due to human case privacy concerns, the user may choose the most accurate option from the list.
-
Map: Clicking on the “Map” heading will expand the map panel to give a view of the site area. Once a site is selected, the trap can be dragged to a new location up to 400m away indicated by the circle.
-
Zero Site Code: Collections using the Zero Code will have no buffer zone and can be placed anywhere on the map. You can read more about Zero Site Codes in the Site documentation.
-
Latitude and Longitude: These fields will be automatically populated once a site is selected, and they can be adjusted with the same 400m limitation mentioned above.
-
The user can make the map zoom in and out using the “+/-“ buttons in the upper left-hand corner, or by scrolling while hovering over the map.
-
The “Show Existing sites” toggle will add gray markers for other existing sites to the map You can click on a site to see the site details and select ‘Set As Site’ to select it as the collection’s trap site. Clicking the blue “recenter” icon in the lower right-hand corner of the map will cause the map view to pan over to the current site marker.
-
-
Latitude: The latitude value. Must be between -90 & 90 degrees.
-
Longitude: The longitude value. Must be between -180 & 180 degrees.
-
Species: The species that make up this abundance. Start typing to filter the list. The list of species in the dropdown can be adjusted through the Available Species settings on the arthropod configuration page.
-
Sex/Stage: The sex/life stage of the ticks in this pool. Start typing to filter the list.
-
Attached: Available for certain method types. Check if the tick was attached to a host at the time of collection.
-
Bloodfed: Check if the tick was in a bloodfed condition at the time of collection.
-
Comments: Any accompanying comments.
-
Linked Collection: Click the blue link button to get a list of collections eligible for linking.
-
Action Buttons:
 : Link the pool to the selected collection. The pool’s collection date, site and trap
values will be overwritten by those of the selected collection. You
may only link to one collection per pool.
: Link the pool to the selected collection. The pool’s collection date, site and trap
values will be overwritten by those of the selected collection. You
may only link to one collection per pool. : Indicates pool is currently linked to
this collection. Clicking on this will unlink the pool.
: Indicates pool is currently linked to
this collection. Clicking on this will unlink the pool. :
Opens subtable to view species details.
:
Opens subtable to view species details.
-
-
Generating New Pools: These fields only appear when generating new pools.
-
Total Count: The total number of specimens in this pool/across all pools (if generating batches of more than one pool). Minimum of 1.
-
Max Pool Size: The maximum size of each pool to be generated. Minimum of 1. For example, if generating pools for 125 specimens total with a max pool size of 50, there will be two pools of 50 to make 100 and one leftover pool of 25 to meet the total count.
-
# of Pools: View-only field. The number of pools to be generated.
-
-
Updating a single pool:
- Count: The total number of specimens in this pool. Minimum of 1.
Manage Tick Pools Table
Filter By:
-
Date lets you select a custom timeframe to search for records.
-
Select the timeframe for which you wish to view collections by choosing the appropriate values using the start and end datepickers. You can type a date value in the format set under Account Preferences or pick a date using the datepicker UI. The # column on the left with the gray boxes represent disease weeks. Clicking on a disease week number will autopopulate the start/end inputs with the appropriate values for that disease week. The table is sorted by most recent collection date then collection number by default, but you can sort the table by any field by clicking on the column name.
-
Beneath the table, you can navigate between pages using the arrows or clicking on a page number. You can also change how many collections to display on a single page using the Items/page dropdown option. The table is sorted by most recently updated pool by default, but you can sort the table by any field by clicking on the column name.
-
-
Recent displays the most recent records to view. The default is 10, but you can use the dropdown to change the number of records to display. The table is sorted by most recently updated record then by collection number by default, but you can sort the table by any field by clicking on the column name.
You can also use the search box on the right to filter results by site code, pool # or other keywords. Clicking the X button will remove the search filter and display the entire table.
Action Buttons:
 : Clicking the edit button brings you to a
filled-in pool form where you can modify the fields as necessary.
: Clicking the edit button brings you to a
filled-in pool form where you can modify the fields as necessary.
 : Delete the selected pool. This option
is unavailable if there are any tests attached to the pool.
: Delete the selected pool. This option
is unavailable if there are any tests attached to the pool.
:
Opens subtable to view species details.