New Site
v5
Gateway URL: https://gateway.vectorsurv.org/v5/site/site
Additional Resources:
- Video Tutorial: https://youtu.be/inN0GJoHGyw
- Walkthrough Guides: https://vectorsurv.org/docs/site/v5/walkthroughs/
Sites represent trap locations. They will help you quickly record collection events and pools without having to locate them on a map or type in coordinates each time.
The Form
-
Active Date: The date that this site/revision was first put into service. Leaving this field blank will effectively make the site active for all dates prior to the deactive date.
-
Deactive Date: The date this site/revision was decommissioned. Leave this field blank if the site is currently active.
-
Site Code: A numeric identifier for the site. Only one site may use a given site code during the active/ deactive date interval. Each agency can assign codes however they want. Codes that have not yet been assigned for sites in your current agency will be listed in the Available Site Code #s box on the right-hand side of the screen. Clicking on an available code will autofill the Site Code field in the form.
-
The “Zero Code” Site: Each agency will be assigned a site with a code of all 0s to be used for “one-off” collections. The default location will be the address of the agency as it is recorded in VectorSurv. If specimens are collected at a location the agency is not likely to visit again, the most common practice is to use the Zero Code site and indicate the coordinates where the collection occurred on the collection itself. This would mitigate the creation of numerous sites that are utilized only once.
-
Site Name: Recommended. This is intended to be an easily memorable moniker for the site. It does not need to be unique. Site Code and Site Name will be searchable and autocompleted on the data entry pages, so it’s helpful to assign this field.
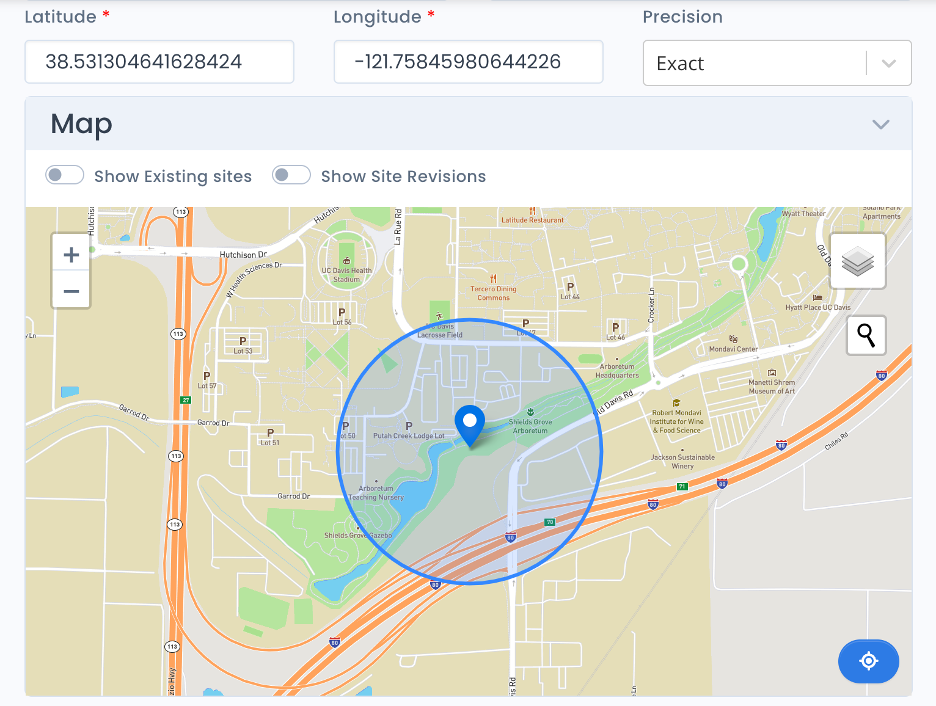
Location: The spatial location for the site. There are three ways to specify the location:
-
Typing the exact coordinates in the Latitude & Longitude fields will place a marker on the map once both fields have legitimate values.
-
Clicking on the map will place a marker at that location and autofill/edit the Latitude & Longitude fields. The marker can be dragged to a new location if necessary.
-
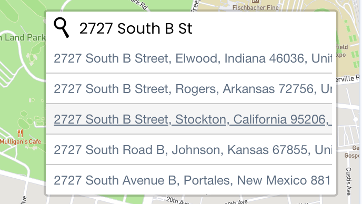
Geocode: After clicking on the GeoCode (i.e., Magnifying Glass) icon, the user may type text into the resulting field, then select an address from a list. The marker will be placed at the chosen location.
- The Map: Clicking on the “Map” heading will expand the map panel to give a view of the site area.
-
Controls
-
The user can make the map zoom in and out using the “+/-“ buttons in the upper left-hand corner, or by scrolling while hovering over the map.
-
The “Show Existing sites” toggle will add gray markers for other existing sites to the map. Active sites will have a white center dot. Deactive sites will have an orange dot.
-
If other revisions for this site code exist in the system, the “Show Site Revisions” toggle will add colored markers for those revisions to the map.
-
Clicking the blue “recenter” icon in the lower right-hand corner of the map will cause the map view to pan over to the current site marker.
-
-
Fields
-
Latitude: The latitude value. Must be between -90 & 90 degrees.
-
Longitude: The longitude value. Must be between -180 & 180 degrees.
-
Coordinate Precision: Used to specify the level of certainty in the site coordinate. In most cases, this field should be kept as Exact. For historical data or other instances where the exact location is uncertain, the user may choose the most accurate option from the list.
-
Additional Fields
-
Elevation: Elevation in meters. Once valid coordinates have been entered, a button will appear to automatically populate the field via an external service. Note: elevation data may not be available for all locations. Can also be entered manually.
-
Address: The address of the site or its nearest intersection.
-
City: The city where the specimen was collected.
-
Postal Code: Also known as a zip code.
-
Country, State, County: The regional designations for the collection location.
-
Surroundings: The surroundings of the site. More than one can be chosen. Typing an original name will create a unique surroundings designation for the current agency.
-
Population Classification: Whether the site is Urban, Suburban, or Rural. Once valid coordinates have been entered, a button will appear to automatically populate the field based on available census data. Note: census data may not be available for all locations. Can also be entered manually.
-
Comments: Any additional notes that should be recorded with this site.
The Revision Card
When viewing a site that has other revisions, or when creating a new revision for a particular site code, the site information card will appear at the bottom of the page.
Revision Timeline Chart
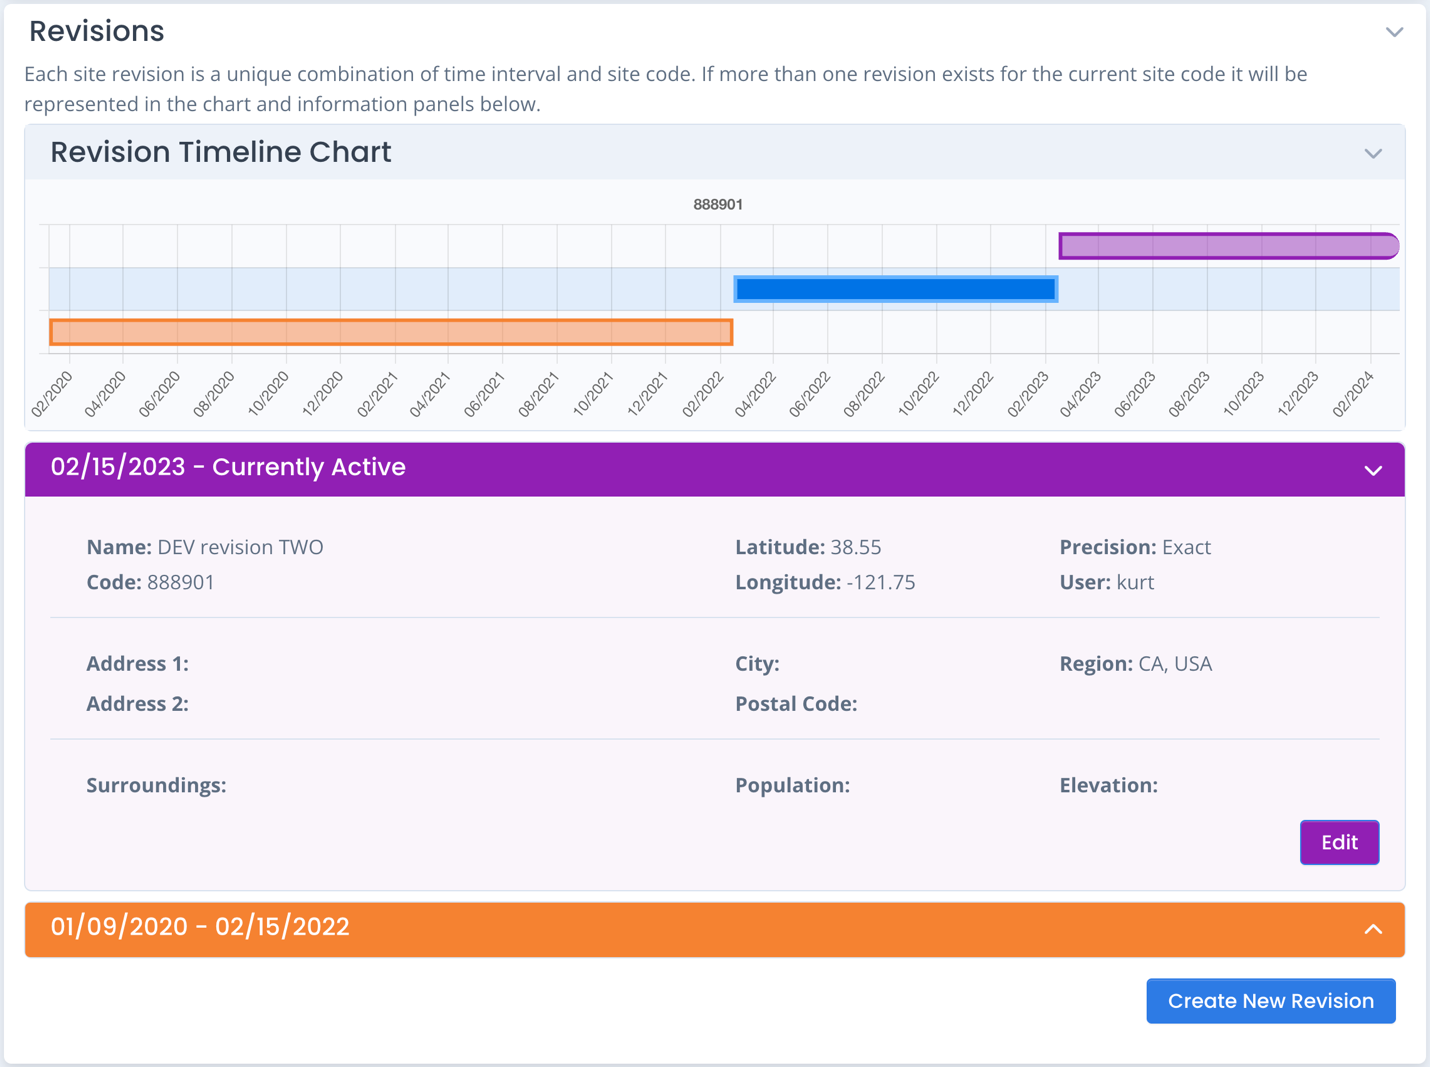
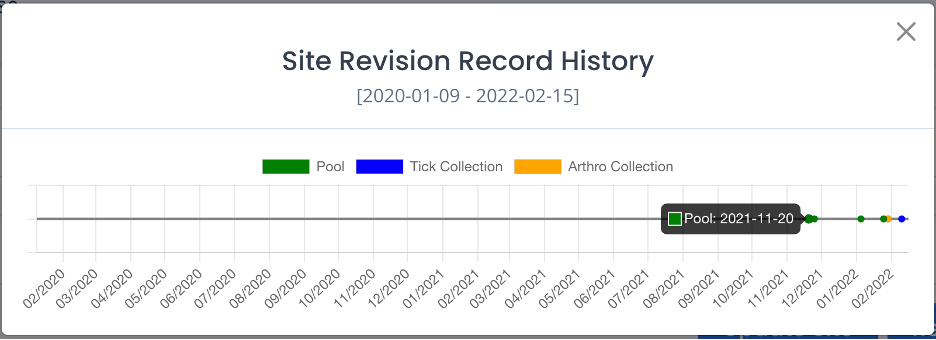
The Revision Timeline Chart is a horizontal bar chart representing existing revisions and their respective time intervals. The accented blue bar represents the revision currently populating the form above. Clicking on a revision’s bar will bring up the Site Revision Record History chart showing a timeline of associated records.
Revision Card
The Revision panel also includes informational cards for each of the site revisions not represented in the form above. Clicking on the Edit button will navigate the user to a form populated that respective revision’s data.