New Collection
v5
Gateway URL: https://gateway.vectorsurv.org/v5/ticks/collection/collection
Video Tutorial: https://youtu.be/9G_-T5stgHk
Collections are the records of tick population data through manual collection methods or the placement of traps.
Date
Date format is based on the settings under Account Preferences.
Fields
-
Spans 2 days or more: Leave this toggle off if the collection was set and collected within the same day. Turn this toggle on if the collection was set and collected on different days. You should see two collection date inputs, one for the start date and one for the end date.
-
Collection Date or Collection End Date: The date the trap was picked up / last day of the collection. You can type a date value in the format set under Account Preferences or pick a date using the datepicker UI. The # column on the left with the gray boxes represent disease weeks. These are for reference-only and cannot be selected.
-
Collection Start Date: The date the trap was set up / the collection was started. You can type a date value in the format set under Account Preferences or pick a date using the datepicker UI. The # column on the left with the gray boxes represent disease weeks. These are for reference-only and cannot be selected.
-
-
Date Only: Leave this toggle off if you have start and end times to log. Turn it on if you only have dates.
-
Start time: You can type specific times or use the dropdown select to pick times by 15 minute increments.
-
End time: You can type specific times or use the dropdown select to pick times by 15 minute increments.
-
-
Timezone: Displays the current timezone. Click on it to open a modal where you can select a custom timezone.
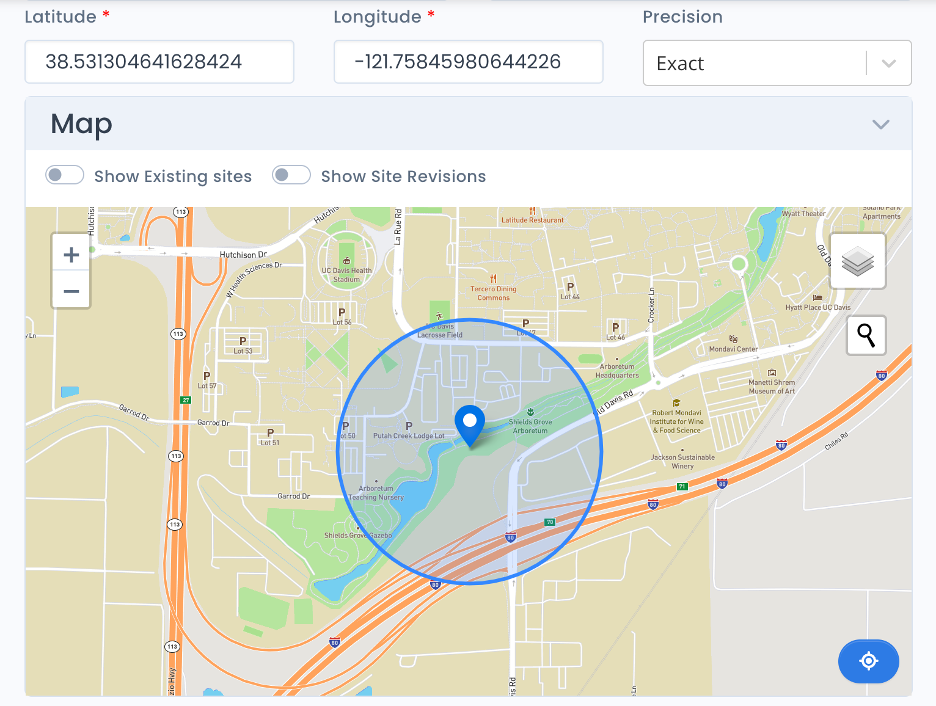
Site
The site where a trap was placed. A collection date needs to be selected before you can choose a trap site.
-
Site Code: Start typing in any part of the site code or name and the dropdown will filter the sites to that text. Selecting a site code from the dropdown select will place a blue marker on the map. You can also select a site using the ‘Show Existing Sites’ toggle in the Map section.
-
Map: Clicking on the “Map” heading will expand the map panel to give a view of the site area. Once a site is selected, the trap can be dragged to a new location up to 400m away indicated by the circle.
-
Zero Site Code: Collections using the Zero Code will have no buffer zone and can be placed anywhere on the map. You can read more about Zero Site Codes in the Site documentation.
-
Latitude and Longitude: These fields will be automatically populated once a site is selected, and they can be adjusted with the same 400m limitation mentioned above.
-
The user can make the map zoom in and out using the “+/-“ buttons in the upper left-hand corner, or by scrolling while hovering over the map.
-
The “Show Existing sites” toggle will add gray markers for other existing sites to the map You can click on a site to see the site details and select ‘Set As Site’ to select it as the collection’s trap site. Clicking the blue “recenter” icon in the lower right-hand corner of the map will cause the map view to pan over to the current site marker.
-
-
Latitude: The latitude value. Must be between -90 & 90 degrees.
-
Longitude: The longitude value. Must be between -180 & 180 degrees.
-
Precision: Used to specify the level of certainty in the site coordinate. In most cases, this field should be kept as Exact. For historical data, instances where the exact location is uncertain or in instances where the exact location need to be obscured due to human case privacy concerns, the user may choose the most accurate option from the list.
Method Details
Fields
-
Method: The type of method used for collection.
-
Host: Available for certain methods. Use dropdown to select host type.
-
Density Sampling Method: Available for certain methods.
-
Distance: Displays area input
-
Time: Displays duration input
-
Not conducted: No additional inputs
-
-
Collected By: The person who collected the ticks in this collection.
-
Identified By: The person who identified the ticks in this collection.
-
Trap had problem(s): If checked, the trap used for this collection is considered to have experienced any mechanical failures, i.e. fan broke, dead battery, etc. Leave unchecked if the trap did not experience a problem during the trapping period.
Conditions
-
Humidity: Enter a percentage
-
Wind Speed: Enter a number. Use the dropdown to select your preferred measurement units. Default is based on the settings under Account Preferences.
-
Temperature: Enter a number. Use the dropdown to select your preferred measurement units. Default is based on the settings under Account Preferences.
-
Moisture: Use the dropdown to select a value. Indicates the moisture conditions at the collection site, trail, etc,
-
Exposure to Sunlight: Use the dropdown to select a value to indicate the overall exposure of collection area.
-
Vegetation: Use the dropdown to indicate currounding conditions. More than one condition can be selected.
Comment
Use this section to note anything other users should know about the collection, including the reason(s) for trap failure, for example.
Species Count
Use this section to enter ticks in the collection. Once a species has been added to the collection, it will appear in the table below.
Note: Edits made to the Species Count are not saved until the Save Collection or Update Collection button has been clicked.
Fields
-
Species: The species that make up this abundance. Start typing to filter the list. The list of species in the dropdown can be adjusted through the Available Species settings on the arthropod configuration page.
-
Sex/Stage: The sex/life stage of the abundance. Start typing to filter the list.
-
Attached: Available for certain method types. Check if the tick was attached to a host at the time of collection.
-
Bloodfed: Check if the tick was in a bloodfed condition at the time of collection.
-
Count: Number of specimens in the abundance. Value can be one of: an integer greater than zero, Present or Too Numerous to Count. Values of Present or Too Numerous to Count are counted as 1 in calculations and totals reflecting those values will include the >= designation.
Abundance Table:
-
Action Buttons:
 : Copy the selected abundance to the pool form. The species, sex and count of the selected abundance will be copied to the pool form.
 : Edit the selected abundance. The
abundance information will populate in the form and will no longer be
viewable in the table. (The data is only moved locally – if you do not
finish editing the form or there are technical issues the abundance data
will still be saved on the collection.)
: Edit the selected abundance. The
abundance information will populate in the form and will no longer be
viewable in the table. (The data is only moved locally – if you do not
finish editing the form or there are technical issues the abundance data
will still be saved on the collection.) Remove the selected abundance from the table. (The data is only removed locally – you must save/update the collection to persist this change.)
 -
Totals:
Total: Total number of specimens of any sex across all abundances in the table.
Pool
Optionally, a pool for arbovirus testing can be entered or linked through the collection page. This links the pool to the collection that the pool originated from.
Generate Pool(s):
Use this form to enter new pool(s) linked to this collection or edit existing pools linked to this collection.
Fields
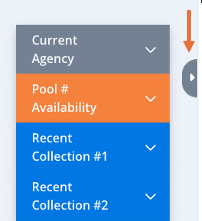
- Pool Number: A numeric identifier for the pool. Pool numbers have to be unique per agency per year. Normally you would start at 1 and increment throughout the year but the exact numbering scheme is up to you. Available numbers for your agency are shown in the aside menu on the right-hand side of the page. Open the orange Pool # Availability card. You can open and close the menu using the small arrow tab on the far-right edge of the page.
-
Species: The species that make up this abundance. Start typing to filter the list. The list of species in the dropdown can be adjusted through the Available Species settings on the arthropod configuration page.
-
Sex/Stage: The sex/life stage of the ticks in this pool. Start typing to filter the list.
-
Attached: Available for certain method types. Check if the tick was attached to a host at the time of collection.
-
Bloodfed: Check if the tick was in a bloodfed condition at the time of collection.
-
Comments: Any accompanying comments.
-
Generating New Pools: These fields only appear when generating new pools. Pools to be generated will appear in the New Pools table. They are not permanently saved until the Save/Update Collection button has been clicked.
-
Total Count: The total number of specimens in this pool/across all pools (if generating batches of more than one pool). Minimum of 1. After selecting a species and sex/condition combination, the field will autopopulate with counts from abundances provided in the Species Card, if available.
-
Max Pool Size: The maximum size of each pool to be generated. For example, if generating pools for 125 specimens total with a max pool size of 50, there will be two pools of 50 to make 100 and one leftover pool of 25 to meet the total count. Minimum of 1.
-
# of Pools: View-only field. The number of pools to be generated.
-
Add New Pool(s): You must first click this button to generate new temporary pools you can view and edit. Once the temporary pools are generated, you must click Save/Update Collection to save them permanently, after which they will appear in the Linked Pools table.
-
-
Updating a single pool:
- Count: The total number of specimens in this pool. Minimum of 1.
New Pools A table of temporary pools that will be saved when the Save/Update Collection button is clicked.
-
Action buttons:
: Edit the selected pool. The pool
information will populate in the form and will no longer be viewable in
the table. (The data is only moved temporarily – clearing the pool form will return the pool to the New Pools table) Remove the selected row.Clear New Pools: Removes all rows from the New Pools table.
Link Existing Pools:
Note: When linking, the pool’s collection date, site and trap values will be overwritten by those of the selected collection.
A table of pools eligible to be linked to the current collection. You can mass select all pools in the table by clicking on the checkbox in the header column. You can also select individual pools by click on the checkbox next to the pool. Once any pool is selected for linking, the mass link button will appear in the header. Clicking on the mass link button will link any pools that have been checked. You can also click on the link button to the right of a pool to individually link a single pool to the collection.

Linked Pools Table:
A list of all pools linked to the current collection. If a pool has a positive test result, the Positive? column will show an abbreviation in red of what it was positive for.
-
Action buttons:
:Edit the selected pool. The pool
information will populate in the form and will no longer be viewable in
the table. (The data is only moved locally – if you do not finish
editing the form or there are technical issues, the abundance data will
still be saved on the collection.) : Unlink the selected pool. This will
remove the link between the pool and the collection.
: Unlink the selected pool. This will
remove the link between the pool and the collection. : Delete the selected pool.
 -
Totals:
-
Total Count: Total number of specimen across all pools in the table.
-
Total Pools: Total number of pools linked to the collection.
-